I’m no stranger to fixing poorly-lit green screen footage for chroma keying. But before I get down to the nitty-gritty of masking, edging and stacking, there’s a little trick that I like to use – it’s really simple, and can often get the green screen one step closer to a clean key.
Don’t expect it to fix everything though – this tip should only be considered as a part of your chroma key troubleshooting workflow.
VIDEO VERSION
Got some tips of your own? Share them in the comments section!
TEXT VERSION
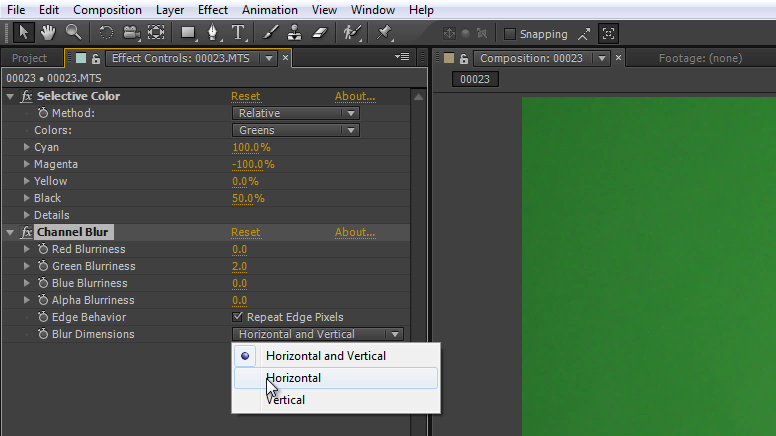
With your chroma key footage setup and ready in a composition, the first thing to do is add the Selective Color effect. In the Effect Controls panel, select Green from the drop-down menu, then dial the Cyan value up to 100 per cent, and the Magenta down to -100 per cent.
This has the effect of really pumping up the green values in the background without actually damaging any of the colours in our foreground plate. You can also adjust the yellow and black values to push the green saturation even further – I often dial the black up to 50 per cent
If your footage has problems with overspill – which is green light reflected off of the talent – then adding this effect will probably make things worse. Like I said – this isn’t a magic wand.
The simplest way to soften the noise, is to drop a Channel Blur effect on the footage and increase the Green blur to 2 (making sure that Repeat Edge Pixels is checked and Horizontal only is selected). This will take the edge off of the noise and will also soften off some of the blocking you can get with heavily-compressed video formats. But don’t overdo it – taking this value beyond 2 will result in blurred footage, and you don’t want that.
Alternatively, if you’re feeling adventurous, you can try the Remove Grain filter – just be warned that it takes a little setting up, and will really slow down your render times.
So that’s how you can give your chroma key some pop before you apply your chroma keyer of choice.


Leave A Comment
You must be logged in to post a comment.